
There have been no updates in the TVR Diary for 3 months now. The car is still here and nothing has been done to it apart from adding some antifreeze to the system but that hardly warranted a mention.
With the chassis looking rather rough and with the tax expiring at the end of the month it is time to prepare the garage for some winter working. A few months of SORN and I'm hoping it will all be back together ready for another summer of fun. It probably would have been more sensible to paint the garage floor in the summer but sunny days are for driving. Currently the car is sitting in the rain waiting for the second coat of floor paint to dry.
It has finally started. I spent a few hours over the weekend preparing the car for a body lift. Almost everything is removed or unbolted. Just need to drop the fuel tank and remember to disconnect the reverse switch and speedo transducer then I'll be looking for some strong men.
During the week I removed the tank and disconnected everything else except the fuel pump power feed. On Saturday some friends and family came round and lifted the body. It wasn't too difficult but we could have done with a couple of extra big guys. The biggest problem was getting the rear section high enough to clear the suspension turrets and the front section became very heavy in that position. Once levelled out it was managable for 4 people. Here's a pic of the car just prior to the lift. The body has been jacked up and is on wooden blocks. This allowed one to get fingers under the bodywork and get a better grip.
Purchased some steel for the outriggers etc first thing then removed the engine.
Todays pics:

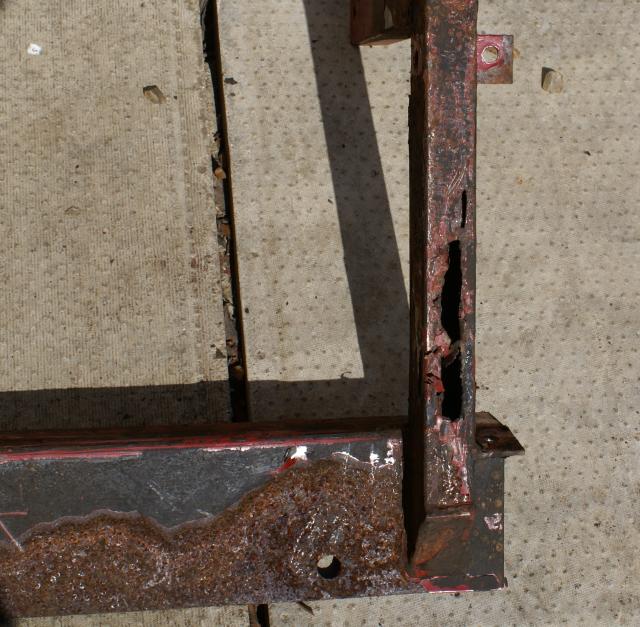
Nearside outrigger

Offside outrigger

Noticed that the fuel pipe had been rubbing on the bellhousing and was partly worn through

Let the cutting commence
Finished fitting the outriggers and tub mounting plates. Just the seatbelt mounts to go and that will be the fabrication done which will then leave the tedious job of cleaning up the chassis.
Decided to start cleaning the chassis. I hadn't intended to go to a bare chassis but as time goes by it looks like that will be the outcome. The powder coat is a pain to remove where it isn't damaged. Best method is a blow torch and a scraper and wire brush. A part of me is tempted to leave the undamaged powder coat that sits inside the transmission tunnel and just give it another coat of paint to keep it tidy.
Todays pics:

Outriggers before they get scrapped

Stripped a bit more off the chassis.
Since the last post it has been stripped down to a bare chassis. The complete offside outrigger has since been replaced after finding a hole under the seatbelt mount. Been tidying up the tube that the trailing arm attaches to and have partly fabricated the rear seatbelt and tub mount.

Offside seatbelt mount on the outrigger. Prodding the tube with a screwdriver revealed this hole.
Still cleaning up the chassis. Using a combination of paint stripper, blowtorch and a twisted wire brush in a drill. I'm cursing the welder who did the chassis because there is splatter around so many joints that it makes removing the powdercoat and rust a real pain. The next one I do will be grit blasted.
Finally have some paint on the chassis. The the zinc stuff from Bilt Hamber called Electrox was used on the areas where there was rust and then did a full coat of POR15 in grey over the rest of the chassis. So that is 2 coats of paint now and just the silver top coat to go.
The POR15 Silver topcoat that was intended to be the protective coating over the grey POR15 turned out to be useless. It never set hard and behaved like some really old paint that has gone off. Instead I've gone for the Hammerite Smooth in black which at least dries tougher than the silver stuff.
Been busy this last week painting the chassis and trailing arms. Fitted the rear suspension during the week and fitted the diff, driveshafts etc yesterday and today. Front suspension is fitted and has been given a quick lick of silver Hammerite. Steering rack has been fitted and now it is back on its wheels. Found out why the rear tyre kept losing air - there's a nail through it. Rolled the chassis out of the garage for the first time.

Done a bit of tidying up to the engine. Replaced the inlet manifold gasket because it was leaking oil in the V. Gave the exhaust manifolds a couple of coats of POR15 Manifold Gray paint to keep the rust at bay. The bolts holding them on seem so rusted that I feared they would snap and I could do without the hassle at the moment. Removed the gearbox and clutch with the intention of fitting a 2.8 flywheel (they're 3Kg lighter than a 2.9) only to find when I removed it that it was a 2.8 flywheel. Turned out my replacement flywheel had been lightened to 7Kg anyway so I refitted the standard 2.8 one.
Dropped the engine in place but have decided that the mounts may have to be replaced. Went for the EM672 from QH which is 2" think but the rubber is very soft and the engine can move about a bit. I've since found another reference in the net that this QH mount is soft so it isn't just me. Will probably get some heavy duty ones from Rally Design when I find enough bits to order.
Replaced one engine mount with a harder one that was in the drawer of bits. Ending seems much more stable now so will source another. One thing that surprised me when I had the inlet manifold off was how clean the top end was. There was no gunge and it didn't look like a 90k mile Ford engine from my experience but I'm not complaining.

One of the original engine mounts had torn and the pic below shows the mount and also you can see where the exhaust has worn from rubbing on the chassis at some point. It's painted over now so that is why it doesn't look so bad.

Final pic for the day is of the engine in the chassis.

A milestone has been reached. Spent the day jiggling around with the engine mounts, fitting fuel line, brake lines, propshaft, gearbox mounts and also replaced the nearside fresh air vent pipework while the body was still off the chassis. Late afternoon the body was lifted on to the chassis with help from my neighbours and friends. A big thanks to Rodney, Trevor, Mike, Colin, Tim, Lou and Chilly. Fitting the body with 6 people was so much easier than removing it with 4 men lifting.
It seems like a slow few days. Drilled the holes for the tub mounting bolts in the chassis plates on the front outriggers. When I dismantled the car I broke the bolt in the rear outer tub mount next to the seatbelt mount because it was corroded and solid and it just snapped. Sourced some replacement stainless 12mm bolts but have just realised that most of the tub mounting bolts are 10mm. Having to use steel bolts for these.
The handbrake lever has been fitted and the clutch slave cylinder rebuilt and fitted. Also fitted a new thermostat so the list of jobs is reducing albeit slowly.
A reasonably productive day. Fitted the replacement brake servo and master cylinder to replace a unit that was badly corroded. Took some getting off because of the sealant between the servo and the bodywork but a pallet knife pushed into the join and then clouted with a hammer shifted it. Fitted the front brake pipes and removed a siezed caliper bleed nipple. The nipple was damaged and had no flats to grip so a hole was drilled into a piece of steel and this was placed over the nipple. A quick buzz with the MIG welder and it was then easy to unscrew.

Filled and bled the clutch system and for the first time there is now resistance all the way down the pedal stroke. Before there only resistance at the end of the stroke.
The fuel tank cradle was next on the list. Seeing as I'm going to be unemployed at the end of June I'm not taking any holiday in order to accrue as much money as possible. Therefore I'm not able to pop to the steel stockholder so decided to patch up the cradle. This is the cradle before the repair.
During my summer off I'll make a new cradle.
There was some racing at Snetterton yesterday so all I managed to do was give the fuel tank cradle and battery tray a quick lick of paint.
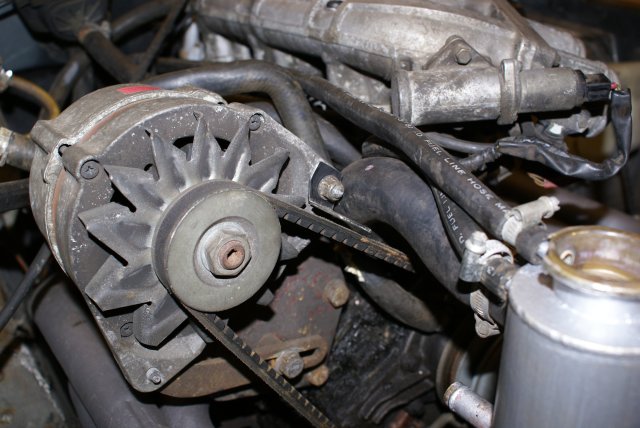
Fitted the swirlpot and connected that up. The main hose from the swirlpot to the block was replaced because the existing one had a groove worn most of the way through. For reference the part number is QH RH1888. To stop the alternator belt from making contact with the hose again I've fitted a small bracket to the alternator. The idea being that should the belt flap around again the bracket will restrict the movement.
It only took a day to rip the car apart but putting it back together is a different matter. Over the last few days I've fitted the battery tray and battery, all the engine wiring is connected, reverse switch located (I put it in that place called Somewhere Safe...damned if I could find it) and fitted. The distributor cap had a budged screw and when I removed it the central carbon contact fell out. A replacement Lucas item cost a rather surprising £18 but it is a while since I played with a car with a dizzy. An attempt to fit it explained why there was a bodged screw - one of the screw holes hadn't been tapped so the bodge was to use a thinner nut and bolt. Because of the location of the hole that needed threading I needed a long tap. None of my regular taps were the right thread and then I remembered that I had a " long tap and it turned out to be a 2BA thread - just what I needed. Tapped the thread and the dizzy fits a treat.
The speedo sensor in the gearbox was leaking oil so this was removed at the second attempt. It is just a push fit into the recess but someone had applied some sealant to it in an attempt to cure and oil leak. Took a lot of prising to get it out and the oil leak is around the cables anyway. Attempted a repair using resin so will see if that works.
Had a look at the fuel tank sender after reading this article and it looked ok. Had a play with using a multimeter and found that moving one of the spade contacts made it work. The solder from the spade connector to the PCB looked very grey and from my experience it looked like a dry joint. Removed the solder and applied fresh and according to the meter all is ok. This pic shows the resoldered connector. Hopefully that is about £40 saved for the time being.

Arrived home to find that the postie had delivered a rear diff mount - another ebay bargain at £7 delivered. Painted the diff mount, fuel tank and rad surround. Bled the brakes brakes using a Gunsons Easybleed system which made short work of priming the system. Yet to see if it is completely air free though. Later in the day I fitted the rad and connected up the cooling system. Doesn't seem much was achieved in the hours spent but it all counts.
Another long day from 08:00 to 19:30 working on the car. Started by fitting the fuel tank and cradle. Sounds so simple when written down like that but when you're working under the car trying to get the tank and cradle into place and get the securing straps to align it was a real pain .
Next up was to fit a new fuel filter - another ebay bargain at £3 delivered. Shame this didn't come up before I had already refitted the original filter but that's life. Under the car again and gave the sump a lick of Kurust This stuff seems to to a better job on rusty metal than Hammerite paint and it leaves a good black finish on the metal.
The S exhaust system is a nightmare to remove and fit especially if it has been knock, bent and had clamps overtightened over the years. I started by ensuring that the L bends fitted into the manifolds. The OS pipe was always lower and has the scars to prove it. It wouldn't go far enough into the manifold because of a welding ridge so I took about 10mm off it. Wire brushed the exhaust paste off and then used a file to smooth out the surfaces. Removed the L bends then moved onto the main exhaust section and again wire brushed and files until the L bends fitted this. Of course it is all very well fitting each joint individually but when all 4 have to come together under a car it gets a whole lot harder. After 2 hours of work the exhaust was fitted but it is now very close to the sump. Some low profile clamps are required - more expense.
Getting there slowly, filled the gearbox with GL4 spec oil and did an engine oil change. Filled the cooling system and sorted out a leak, connected the battery and we were all set. The car fired up on the 3rd attempt it settled down to a nice slow burble. None of the exhaust blowing noise of before. Checked underneath and there was a clear liquid pouring over the exhaust. Killed the ignition, grabbed the foam fire extinguisher and rolled the car out of the garage. Fuel was leaking from a fuel line. Further investigation is required but it looks like it is the fuel return line and that when the body was fitted the fuel line was pulled out of the connector.
The fuel line wasn't properly in the connector hence the leak. Fortunately you can just reach it through the gap between the engine and the bulkhead and it was just a case of pushing it home. It has not leaked since so fingers crossed.
Replaced all the connectors that join the front lights to the loom. All looked fine until I tried the hazard lights and at that point the headlights started flashing. Haven't got to the bottom of that yet but with an MOT due in 3 weeks it needs sorting soon.
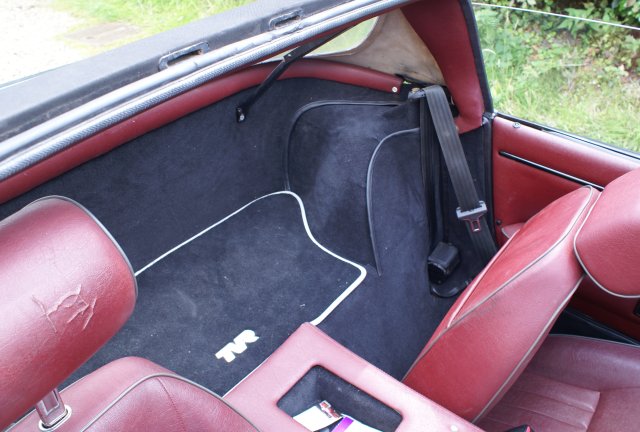
I wanted to refit the centre console but as the interior is due some new carpet it makes sense to do that first. So the evening was spent attempting to remove the rotten carpet in roughly one piece and then cutting and fitting the new carpet. Was never keen on the old faded grey so have gone for some black stuff. It's made for Volvo and is allegedly rot proof so from my perspective it is better than what is there. Because of the area of carpet that needs replacing I needed a lot of contact adhesive so ebay again came to the rescue with a 5 litre tin of the stuff.
In this pic the transmission tunnel has been done and the floor mat replaced to enhance the effect. In the background you can just make out the rotten state of the original carpet.

I love the smell of contact adhesive... just as well really as I had me head in the passenger footwell replacing the end carpet. While the ECU/fusebox flap was off I replaced the grey carpet on that. Wilton carpet does seem a strange choice for a make of car that is renowned for being less than water tight.
The drivers window hasn't worked since I put the centre console back in. Tried swapping the switch over but that made no difference so it is probably a wiring issue. Another small job to sort out.
Having purchased a tax disk during the week (talk about confident) I then bolted in a seat and took it down the road. Initial impression on the pot holed lane is that the car is much more solid. A quick brake test showed a softer pedal with a bit of travel that doesn't do much then a lot more braking power - enough to lock the wheels comfortably now. Lots of smoke from under the bonnet but this was just the manifold paint burning off. After a cool down the water level was low again. No external leaks so I'm wondering if the inlet manifold to valley gasket is leaking. This was replaced earlier because it was leaking oil so seems a likely suspect. Took the rocker covers off and had a poke around but there was no water visible so if it is leaking then it is leaking into a cylinder - possibly from the waterway to inlet tract. Will keep an eye on it.
Bolted it all back together and then took it out for another run down the road. Seems to be working fine but the speedo is reading high still. Was hoping that with the earth points having been cleaned up that it would be better. Had to top up the water with about 250ml. Could still be air locks because that was a longer run and it needed less water to top up. But the important thing is that it is back on the road..... just in time for the rain.
The door mirrors are currently rusty Escort Mk2 mirrors. They work well but are tatty. I'd acquired a pair of Austin Mini mirrors from something like the Cooper. I think they were also used on some Metros. Gave these a quick rub down then spayed them with 2 coats of a satin black paint.
Just to show how scruffy the interior is I have a better pic.

Not done much in the last few days so cracked on with another one of those jobs for the MOT. Last time there was an advisory that the rear side lights flashed withe the indicators. Not surprising really considering the state of the light boards and connectors. Acquired a mint set of light boards and some connectors with flyleads through ebay (again) and fitted these to the TVR loom. The advantage of the Ford wiring is that it is thinner and more flexible than the TVR one so the cable will bend without wanting to pull the connector off the pins. Clipped the cables into place and now the lights work and no flashing sidelights. Took the car to the supermarket for the weekly shop and it started raining.
Back in the dry I started the job of fitting the door mirrors. removed the door cards and undid the mounting bolts for the existing mirrors. Had to hack away some one the old P38 used to fix the original mirrors then knocked up an alloy strip with 2 rivnuts secured to it. The new mirror then was bolted to this as per the pic below.

The outside isn't so good because when it has a respray at some point they didn't clean up the mirror mount properly and painted over sealant etc. The new mirror doesn't cover this so at some point this will need a quick spray paint job.

And a bigger picture view showing one of the new mirrors.

I was thinking about the problem with the speedo and for some reason I decided to check the ignition switch connector that is a known weakness. In the pics you can see the connector in situ and also separated. No prizes for spotting a problem. The 2 x white wires and the black wire were cut from the connector and joined with a 35A crimp connector.


The problems with the speedo started during my ownership. When the lights or the demist fan were turned on the speedo would rise. For example 50 would increase to 60 on a dark wet day with lights and fan on. Turn on the dash lights as well and it would read 65. The good news is that the above connector has resolved that problem.
Replaced the offside wheel cylinder after I found that it was a different size to the nearside one. Had to make up a new brake line that runs along the trailing arm because it was stuck into the existing wheel cylinder.
MOT day.... and it failed. Fortunately it was a minor fuel sepage from the connector to the fuel filter and a quick tweak with a spanner sorted that out and a pass was duly issued. Just a couple of advisory notices. The horn isn't that loud and also the offside trackrod end has a small amount of play in it.
However it didn't go as planned. There is something wrong and it boiled over just after reaching full temperature for the emissions. Need to think about this but I am wondering about the water pump. Time to drain the system and check that all pipes are ok.
I've been working on the car since the MOT trying to get to the bottom of the boiling issue so this update is a consolidation of weeks of frustration in one posting.
Couldn't see why it should be boiling so I decided to start pulling things apart. Removed the water pump and all was fine. Replaced pump, filled the system and it still boiled over yet the temp gauge was only about 90. Because I was also getting a mechanical noise from the engine when running at 3000rpm for a while I decided to remove the head. Nothing much here except the exhaust valves were a bit coked up. The gaskets didn't appear to be blowing but there were some suspicious marks on the underside of one. Cleaned the head and refitted


When fitting the heads I didn't want to use stretch bolts as they work out expensive each time you remove them and I'm not confident that the problem will be resolved. I noticed a thread on a forum dedicated to Ford engines and they talked about reusable bolts for their twin turbo setups. The bolt spec was 12.9 high tensile steel. Now someone said that this is better than the stock 8.8 bolts used. So as I don't have a turbo I guessed that the stock 8.8 bolts would be ok for my needs. Acquired some from an engineering supplier and when torquing down on stage 3 (95-115Nm) I felt that this was way too high for these bolts. Sure enough, on the second bank one stretched. I then thought I'd check on what a M12 8.8 bolt is capable of and the figures were between 83 and 87Nm depending on finish. So my 110Nm was way beyond their rated capacity. So much for expert information that the stock bolts were 8.8.
I then spent several days trying to track down M12X90 12.9 hex head bolts with no luck. In the end I used cap head ones from a nut and bolt specialist in Watton. I replaced the existing hex bolts one at a time so hopefully the head gasket won't mind and so far it is ok.
Re-assembled the engine and took the opportunity to replace one of the pipes from the swirlpot to the pump. The original pipe goes over the alternator belt and to my mind is just waiting for an air lock. I replaced this with a piece of straight hose that goes through the middle of the belt and air should just flow straight out to the swirlpot. It does mean that I need to removed the pipe to replace the belt but as it is a newish belt I'm hoping it will last a few years.
Took it for a test run and it was very hesitant. Got back then realised I'd not reset the ignition timing and a quick squint with the timing probe showed between 0 and 3 degrees advance at idle. I also remembered that I'd not regapped the plugs since removing the heads so sorted this. Most were open to 0.9-1mm so closed them to the 0.7mm for that spec of plug. Then reset the ignition advance to 9 degrees although most places say 12 degrees. I'm playing safe at this stage. The other thing I'd noticed is that the fan wasn't kicking in and this was down to a dodgy connector. Replaced this and the fan works. I had a closer look at the pressure cap and realised that the rubber sealing ring was now going down the side of the metal plate underneath it. This would surely affect the way it sealed and probably meant I wasn't getting 15psi working pressure. Removed the excess with a sharp blade but need a new cap really.
Another test drive showed an improvement although I still had a mechanical screech/rattle noise after a quick dual carriage way stint (genuine 70mph) as I came to the end of the slip road. A quick spin round and back onto the dual and at the next exit the noise didn't occur.
So at this stage I have a sort of working car yet I still don't know if it is boiling. More later....
Picked up a swirlpot pressure cap today - it's QH FC53 and cost £2.80. Made up a rubber sealing washer from a MTB innertube and fitted. Took it for a test drive and the cooling system still seems to be behaving.
Still not convinced about the static ignition timing because there are so many different figures quoted. The bible says 4 BTDC for 95 octane and 8 BTDC for 97 octane. However the Haynes manual for the 2.9 Sierra says 12 BTDC and a Haynes tech sheet for the TVR S says 15 BTDC. So it could be anywhere between 4 BTDC and 15 BTDC.
Think I've sussed out the ignition timing confusion so here goes my theory.
There are 2 specs of ECU used on the S3, the 86GB 12A650AC and the 88BB 12A650JA. The 86GB one has an ignition map for leaded 98RON fuel and the 88BB is mapped for unleaded 95RON fuel.
Now the confusion comes when some sources suggest retarding the ignition for 95RON fuel. This is only required if your car has the 86GB ECU.
When setting the ignition timing you must use the Ford STAR (Self Test Automatic Readout) unit however something like the Gunsons diagnostic tool for the EEC-IV unit does the same job. When the engine is in service mode the idle control valve is closed and the ECU doesn't control the idle speed at that point. Then it is a case of setting the timing to 12 BTDC if you have the 88BB ECU and intend to use 95RON fuel. If you have the 86GB ECU then either retard the ignition to 8 degrees BTDC if you intend to use 95RON fuel or set it to 12 BTDC if running Super Unleaded or better.
I have an idea where the 15 degree BTDC setting comes. The S3 owners handbook states that the car runs on 97RON fuel yet they had the 88BB ECU that was mapped for 95RON fuel. By advancing the ignition by 3 degrees they were then getting the benefit from the higher octane fuel. This probably partly explains the high BHP figures quoted by the factory.
Summing the above into a simple table:
| Fuel RON | Timing 86GB 12A650AC |
Timing 88BB 12A650JA |
| 95 RON | 8 BTDC | 12 BTDC |
| 97 RON | 12 BTDC | 15 BTDC |
There is also a connector that can be used to retard the ignition by 4 and 6 degrees. This could be wired to a switch and if the car is set to the 97 RON settings above the switch could then be used to set the timing to a 95 RON setting. This then gives the best of both worlds without messing around with ignition timing in the future.
Today I finally fitted the spot lights that have been sitting in my lounge since February. The old ones looked rather tatty to put it mildly and looked worse when removed.
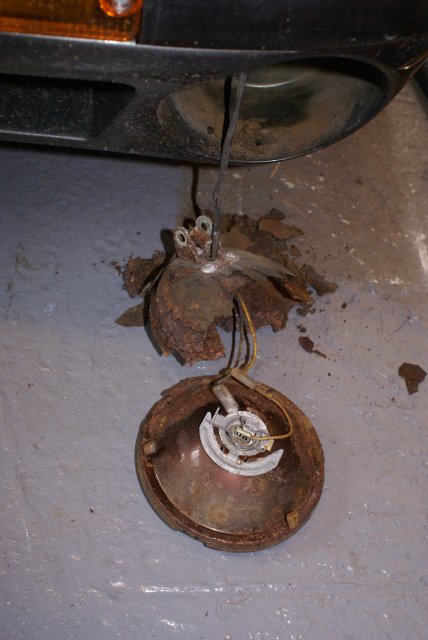
The new ones made a big difference to the appearance of the car. Thought I'd leave half the reg number on the pics so when you see it parked up you have a clue as to whose car it is.

When I was doing the rebuild I thought about modifying the throttle plate to make the car more responsive. Having experienced the sensitive throttles on my previous Westfields it was something I wanted on the S. Recently there has been a bit of talk on the S forum on Pistonheads about this and the response (sorry..) is favourable. Therefore I set about my spare throttle plate with a cutting disc and a MIG welder. Here's the results in a before and after pic.


I've had one of those "since you" problems. You know the sort, "since you fixed my front door the bathroom tap has leaked". After doing the throttle plate the car has cut out 3 times. Once backing it out of the garage, once testing to see if I'd fixed that problem and again yesterday on the way to the DIY superstore. In all cases it started again after a few minutes. First time I didn't do anything and it fired up. The second time I poked around the HT leads and coil lead and it started. I thought it was a loose coil lead. The third time I poked around the HT leads and coil lead but that didn't fix it. Left for a minute and it then started.
Thinking about the way it lost power it seemed a gradual loss so my attention turned to the fuel system. Checked the relay and that seemed fine and was fully seated and the relay contacts were clean. Then looked at the fuel pump and... ah, I thought I'd replaced that connector with a temporary new one. Obviously not because it was still running the old connector that I'd had to repair. Cut the old connector off and fitted some bullet connectors as a temporary solution until I sort out the SureSeal connectors.
Took the car out for a test drive and it seems so much smoother and quieter now. Even the strange metallic noise I've been trying to track didn't materialise. One other thing I noticed was that the fuel pump made a higher pitched (ie faster) pumping noise. I've suspected that the car might have been running lean but not been able to prove it.
Back from the test drive I had a smile on my face for the first time in ages. It is now starting to feel and go like a sports car. One thing I must note is that some of the front wheel nuts were not fully tight. I use a torque wrench on my nuts so know that they were tight before. The rears were fine so I'll be keeping an eye on them.
All the rotten grey carpet has finally been replaced with nice new black stuff. Saved a few kilos in weight as well due to the new synthetic carpet being much lighter than the original Wilton. While replacing the carpets I removed the rear 6x9 speakers and pop riveted some alloy sheet over the hole. I don't use the radio much and I think they look naff on the rear bulkhead anyway.
Been using the car a bit more and getting some severe judder from the clutch when pulling away using lowish rpm. If I give it 2000rpm then it is hardly noticable and when moving there is never a problem. Will be keeping an eye on it.
I also have had a slight hesitation when accelerating so took the plugs out to check their condition. Spot the odd one out from the photo below.

Number 2 cylinder has a very clean plug compared to the rest although it does look newer but I've done over 4000 miles in the car so it can't be that new. My initial thought is that this is due to an injector that is slightly gummed up therefore I have taken the easy first step of putting some injector cleaner in the tank. We'll see what happens and take it from there.
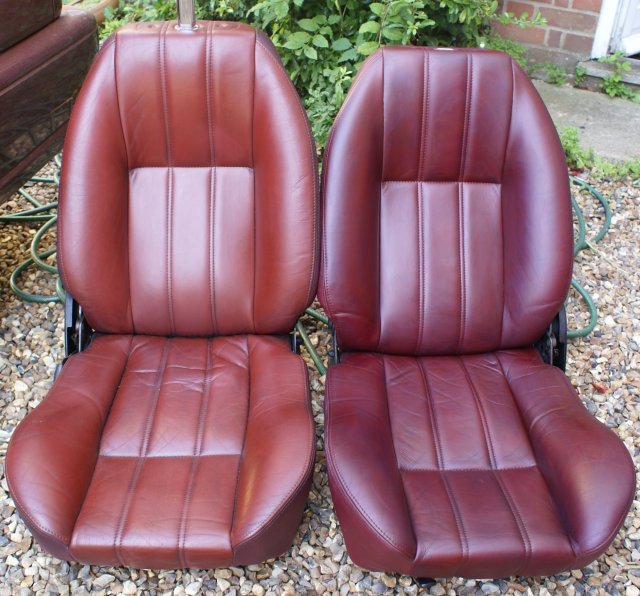
Many moons ago I purchased some TVR Chimera red leather seats. When they arrived the red leather had gone to more of a tan colour so I left the seats in the spare room and did other things. Now that the carpet is done it was time to review the seats. I purchased various redish leather dyes hoping I could dye it to a close match to the mullberry interior. Out of all the dyes tried the dark red was the closest. The headrests came up a treat but the seats have a few streaks where the dye is a bit darker. I'll work on these over the months until I'm happy with it but you can see the difference between the original faded seat and the dyed one on the right in the pic below.
I'm still trying to trace the metallic rattle when the car is driven at motorway speeds. It's almost impossible to hear it at 70mph but as soon as you back off the throttle and slow down the noise is there but afer a few seconds it clears. Thinking that it is an exhaust rattle I removed the exhaust and cut open the top weld to see what the insides were like. Apart from a lack of wadding it looked in one piece. However I did find a crack in the top of the oval section and the edges were black indicating that it was there before I attacked it.

The system was welded back together making sure the perforated sections were welded to the outer walls to reduce the chance of rattles. The exhaust is now fitted and I've taken the opportunity to place some exhaust wrap around the downpipe to L bend joins to ensure a good seal. The wrap had a generous smear of silicone sealant as well to aid the sealing. Initial impressions are that it is much quieter in the garage but bad weather has prevented a road test.
Took the car out for a drive yesterday and the horrendous loud metallic rattle that occurs after high speed runs has gone.... only to be replaced by a constant buzzing rattle.
Removed the exhaust again and spent 1.5 hours cutting it open and hacking out the perforated inner from the oval section. Turns out that this was cracked along half its length. Welded it back together, fitted it and gave it a test drive. It is now slightly louder with a more metallic rasp to the exhaust note but no more rattles.
It now feels like the car is complete and working as expected. The only mechanical issue is clutch judder when warm and at low revs. If I use 1500rpm then it is fine so that will be the work around for the time being. Now it is time to enjoy the car.
I'd noticed on the last two outings that there was a rumble and it was starting to mask the exhaust noise so needed attention. As expected, the nearside bearing was the culprit and the wheel was rough to turn on the car. 1.5 hours later and new wheel bearings were fitted and the wheel turns smoothly and quietly now. Still needs to be road tested though.
Been using the car a lot since doing the wheel bearing and it it running fine. The only thing that I've done to it in the last month was to fit the new spark plug leads I'd picked up. During the rebuild of the car I kept seeing the spare enine on the stand and it had a dizzy cap with male connectors. Therefore when I purchased some leads they were to fit what I'd been looking at for ages. However the engine in the car has the other style of dizzy cap. Fortunately the spare engine dizzy cap was new so this was swapped over. Now I'm running properly on all cylinders again the engine idles really smoothly.
Next update in a month I guess....
Nothing much to add. Used the car a bit lately but the weather hasn't been great so it hasn't been out as often as I'd like. Took it out for a blast today and the roads were very slippery but the S behaved very well and the amount of notice it gives you that it is losing traction was surprising.